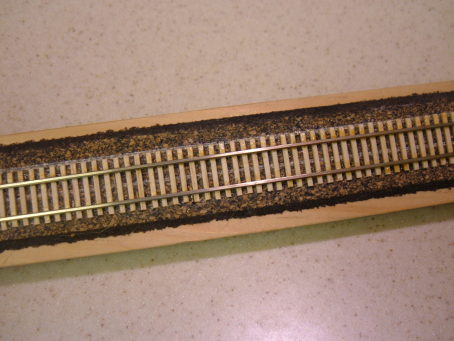
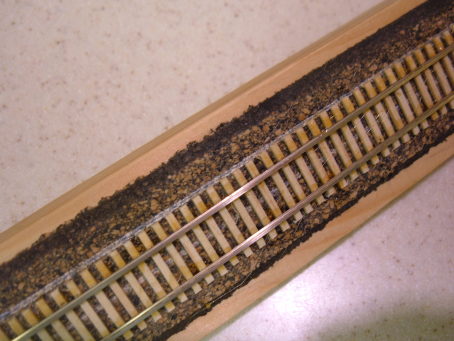
Hand laying N scale track.
There’s a lot to learn about hand laying
The good news is that if you are motivated, all difficulties are readily overcome through extra care, experience or tools, most of which are relatively inexpensive. Here’s what I learned from my first hand laying efforts:
Why am I being so anal about all this?
This is a long post with lots of detail and I’ll update it occasionally when new things occur to me. This post is my reminder of all the stuff to be careful about when track laying.
But the real bottom line is this: smooth flowing track is a thing of beauty and will lead to you being glad you model in N scale. The reverse is true too!
Good access is critical
For my first N scale hand laying project, I was working on a two foot piece of 1x2 lumber as subroadbed. I could turn it any way I wanted to work on it or to check alignment. If the subroadbed had been fixed in place, I would not want to have it more than 18” from the front edge and preferably within 12”. If the track will be located more than a foot from the edge of a layout, it should be removable and the hand laying can be done at the bench.
Create you centerline very accurately
I use 3rd Plan It to design my track plans. I then carefully transfer the centerline to the subroadbed from printouts. You don’t have to use a computer to generate your lines, but if you have imperfections in your centerline, they’ll likely be transferred to your hand laid track.
Maintain your centerline
It seems obvious, right? It really matters in N scale and many things get in the way of the centerline being preserved. The line may be drawn thickly (don’t do this!). Use a fine point pen or sharp pencil. This way, you will not introduce lateral slop into your reference line. When you put glue down on the subroadbed, keep it away from the centerline so the glue doesn’t obscure the line.
It is tempting to lay cork quickly with the first half piece waving back and forth over the line. Take your time, and line the edge of the cork exactly against the line. Wait till the first half is completely dry (or solidly pinned) before gluing in the second half of the cork roadbed to prevent pushing the join line out of alignment.
Yeah, I know it’s a pain but by keeping the centerline visible you will have a valuable reference as the ties and rails go down. Unlike flex track, there is no way to fix poor alignment of hand laid track after it is laid.
Keep things smooth
Sand the roadbed before gluing ties. Sand the ties before gluing rails. Easy does it. Use fine grit paper on a block that is at least 5” long and check every few strokes to make sure you aren’t removing too much material or creating waves. The longer block will prevent waves from forming. This is especially important for the ties which are made from sugar pine which is soft, and besides, they are only half a mm thick. You also need to be careful of bumping adjacent ties or other details while sanding.
Use a fine white pen to mark the centerline on the cork
Once the cork is down, you have the centerline because you can see where the two halves of the cork come together, right? Not always! Cork is dark in color and sometimes the join line is hard to see depending on lighting. It certainly gets harder to see once the ties have been glued in place. For hand laying, you still need to see the centerline once the ties are glued down. The answer is to draw in the centerline on the cork with a white pen. I like the Uniball Signo White Gel Pen UM-153 which I got from Jetpens for $2.99. I’m sure that others will work too.
Good ties matter
What’s a good tie? One that is the right length and width, evenly cut, free of burrs on the cut ends and the same as all the other ties you’ll be using! Assuming you are using a tie alignment jig, furry ends will prevent the tie from sitting in the jig against the stop resulting in uneven ties.
Now, it’s true that real ties vary in alignment up to about 6” on the ends and more usually up to 3”.
 That translates to about half a millimeter in N scale. So here’s where precise tie length matters too. If the ties vary more than 0.5 mm the line of ties will look uneven on one side and even on the other. More on this later in a future post.
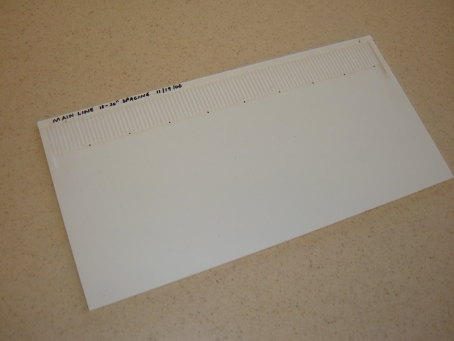
Use a tie spacing jig
You have two choices for tie spacing - do it as you lay ties, or, use a tie jig and create tie strips. There are three reasons why I think a tie jig yields better results. First, when the ties are put on the cork, there is glue in place. So any method you use to space the ties at this point will eventually become covered with glue. The second reason is lateral spacing. It will be very difficult to hand position ties with precision of +/- .25 mm relative to your centerline. As a result, you’ll end up with a line of ties that is too uneven on both sides. I’m not saying you couldn’t do this, but it will be hard to do or to do reliably. Thirdly, tie strips are quicker. You can load ties into the jig about 30 per minute - that’s about 4” per minute. Do it in front of the TV with a nice glass of red.

Make your own tie spacing jig
See post on this blog about making your own tie strip jig.
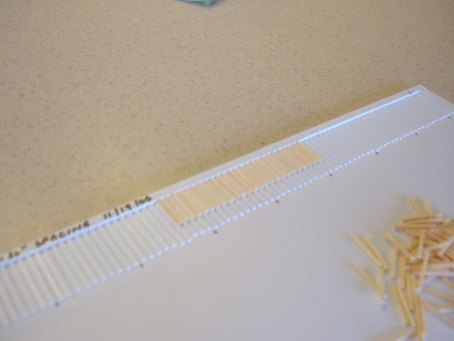
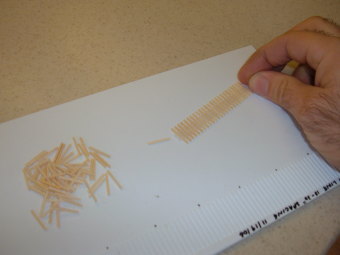
Start out with short strips of ties
It is tempting to fill the whole jig with ties. Here are a few reasons to just do 4” to 6” at a time. The more ties in your jig, the more likely ties are to pop out along the way. Small strips are easier to remove from the jig. Small strips are easy to handle and glue in place.
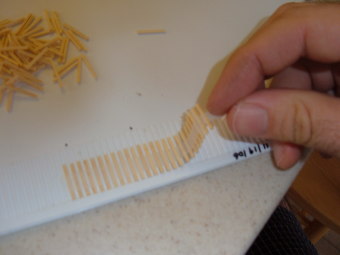
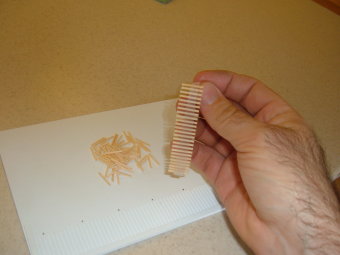
Use tape to pick up your tie strips
To create your tie strips, make sure all ties are pushed firmly against the stop and place a strip of sticky tape on the ties. Rub the tape onto the ties then gently lift the tape at a shallow angle to the jig. As the tape rises, the ties will be pulled from the jig by the tape and will be correctly spaced.

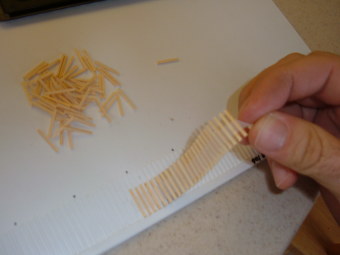
Masking tape is better than sticky tape
I have mainly used sticky tape on my strips but I think masking tape will be better. The sticky tape I have on hand is 3M invisible tape which fine from a tackiness standpoint but suffers from static electricity. The tape is attracted to many things. As you move the tape in toward the ties, they start jumping out of their troughs! Bye, bye, alignment! To get around this tendency, hold a steel ruler along the row of ties to hold them in place then bring in the tape. I plan to use masking tape to find a better performing tape.
Use very thin tape when the tie strip will be used on curves
I’ve been using invisible tape from 3M. It’s about a cm wide and non-strechy so they will not bend. That’s fine, even preferred, when the tie strip will be used on tangent. For curves you need to slit the tape between the ties with a knife so the strip will curve. This sort-of works but the tape is prone to breaking once slit. Better to use thin masking tape. Put the tape on the line of ties and press in so all ties are sticking to the tape.
Aligning the tie strip to the centerline is critical!
Why? Because wherever you put the ties, determines where the rails will have to go. If the ties are glued in the wrong place, even half a mm out of position, you have a dilemma. You either lay the rail correctly aligned to the centerline, but positioned wrongly on the ties, or, you line the rails up to the ties, but in doing so, you’ll create track that is out of alignment relative to where it’s supposed to be. Not great choices so how do you get around this? The bottom line is you have to get the tie strip exactly in place relative to the centerline (which you have been protecting and preserving, right!). Using a spacer or compass, mark tie end lines (white pen) on the roadbed exactly 8.5 mm either side of your centerline (assuming 8.5’ ties).
Use minimal glue to attach ties
Everything will be eventually bonded at the ballasting step so you don’t need much glue under the ties at all. You only need enough adhesive to hold the ties in place for sanding and holding the rail.
I use Elmers yellow wood glue for two reasons. One, it is strong so you don’t need much of it. And two, it dries fast. I can sand a line of ties a few hours after gluing. Obviously overnight is better. Put the glue between the centerline and the tie end lines. It’s not a big deal if the glue goes over the lines here or there, it dries clear anyway. Another reason to use very little glue is that it will squeeze up between the ties filling in the spaces where your ballast will eventually go. Not all of the ties will sit evenly once the strip is down. Press the ties down individually with your fingers after the strip is initially positioned.
Glue 4” to 6” strips of ties
I think it is better to lay multiple short strips just because it lessens the chance of gluing down a lot of ties out of alignment. Short strips are easily handled and adjusted which are valuable attributes. I assume once you have laid hundreds of feed of track, you’ll feel more comfortable with longer strips. I’m not there yet.
Last chance for adjustments!
Use tweezers and your exacto knife with triangular blade to adjust individual ties or groups of ties. You may need to slit the tape to get troublesome ties into place. If the ties can’t be moved into perfect adjustment, pull them up now and wipe as much glue off with a damp rag as possible (always keep a damp rag handy when gluing).
Use weights to hold the ties in place while the glue sets
The ties can be easily bumped out of place. Yes I know they look great but don’t touch them till they’re dry!. Get some 1 - 2” clean washers and a few similar sized nuts and bolts from the hardware store. The washers make great track weights as they are heavy and flat. You can stack up as few or as many washers as you need and distribute them along the track to keep the section that is gluing pressed down flat. The fit easily in your tgrack laying tool kit too.
Go do something else
Let the glue set. You’ll be tempted to test and even sand ties before the glue has set as you’re now so close to putting down some rail! Resist that urge as knocking off even individual ties will means you’ll have to glue them back in place and the glue will need to set before that strip can be sanded smooth. Go do something else and come back to this tie strip later. This is not the stage to rush.
Remove the tape
Once the glue is set AND NOT BEFORE! the tape can be removed. It is really tempting to pull off tape to see your handy work. Resist this temptation! Wait till everything is fully set. The main reason for this is that the ties will likely move and the bond will be weakened as you pull the tape off if the glue is not set.
Even once the glue is set, hold down the ties with a flat edge, like a steel ruler while you carefully peel the tape off. Take your time. All it takes is for one tie to loosen and you’ll be waiting for the replacement to set before you can sand and get to lay any rail.
Sand your ties smooth
A few passes with the sanding block is all you’ll need. You need to do this because some ties will sit a fraction higher than others creating small humps that will be noticeable when you run trains. The goal here is to make these ties all smooth as a group and smooth with the ties next to this group. Use a long sanding block at least 5” long and check your work every few strokes. It’s real easy to take too much off. Use a steel ruler to check for humps and significant dips.
Don’t lay rails up to the last tie if there are more ties to be glued in place
You need to sand the next set of ties smooth with the existing ones and you can’t do that if the rails are in the way.
The position of the first rail is critical
The first rail must be postioned relative to the centerline. The outside edge of the ties is unreliable as the ends are often not even. Use a simple jig to mark rail locations relative to the centerline (which you can see easily below the ties because it is marked in white on the dark cork!).
Start laying with 12” lengths of rail
A foot is plenty to deal with till you’ve had some practice! It’s all I want to deal with for the moment.
Contact cement is great
I love this stuff. Coat both surfaces to be bonded, in this case wood ties and steel rail. I use a toothpick to apply the glue which is very sticky and stringy. The toothpick doesn’t pick up very much glue so you can’t mess up.
Putting glue on the rail
The rail base is thin so you don’t want much on your applicator. Be really careful to not get any glue on the rail web. If you pull the toothpick across the rail base, you’ll get a dribble of glue on the web.
Putting glue on the ties
The wood ties accept the contact glue readily. Put a line of contact glue along the rail line where your first rail will go. Get a little glue on each tie. Don’t worry about the pale yellow color of the glue on the untreated ties, it will be covered up later when the ties are sprayed. Let the glue dry to tackiness (about 5 - 10 min).
Laying the first rail - Finally!
Take your first rail and carefully join it to the rail it is continuing and press it onto the glue on the rail line marked on the ties. It will bond pretty well but you will still have some play for several minutes. It is very important that the first rail is correctly positioned relative to the center line. If you can’t get the rail into the correct position at this point, pull it up and start again.
Soldering glue!
This is a cool aspect of contact cement. I first encountered it in the Fast Tracks documentation for their turnout jigs. Placing a hot soldering iron on the rail base cures the glue pretty much instantly. So, starting with the fixed end of the new rail, and with the rail positioned on the rail line on the ties, gently touch the base every few ties to make the bond permanent. For tangent track, hold a steel rule against the rail checking frequently as you go and you will end up with the most beautiful straight rail fixed firmly in place.
For curved track, make sure that the rail stays positioned on the rail marker line as you ‘solder’ it in place. Curve templates can also be used. However, one of the nice aspects of flex and hand laid track is the free choice of radii. So, you will often not have a template for your 17 and 7/32” radius curve. So, it’s back to the centerline and the rail placement lines which were carefully drawn relative to it. Note, get the rail very close to perfectly positioned before you start soldering. Unlike flex track, you cannot slide the rail along the ties in response to radius changes in your length of rail.
Lay the second rail using wax paper
The second rail is really a piece of cake to solder in place. Put glue on the rail and ties the same as for the first rail and wait till tacky. With the second rail, use the rail position line but don’t lay the whole second rail all at once. That could lead to the second rail glued in to place but out of gauge.
So here’s something that I tried when I started hand laying and it worked beautifully. Before putting the second rail in place, lay a 1 - 2” wide strip of wax paper along the glue line on the ties. The thin strip will sit in place better than a big sheet. The idea is to progressively expose rail and tie to each other rather than all at once. Expose the first inch of tie strip glue where you’ll start fixing the second rail in place (usually the existing rail you’ll be connecting to).
Position the second rail on the rail marker line and using the track gauge at that point, solder the point closest to the existing track. Then, gently pull the wax paper away from the start point exposing a little more rail to ties. Press the exposed rail and ties gently together and slide the track gauge along the track. Heat the base with the soldering iron every few ties. Make sure you only solder the second rail right next to the rail gauge so you are always fixing the rail in place when it is correctly gauged.
When you are about five ties or so from the the end of the wax paper, pull it out the wax paper to expose a few more inches of rail to the ties and solder in place using the track gauge. Repeat till the whole rail is soldered in place.
Trim the tie ends, carefully
With the second rail in place you have a pretty good idea how your track will look. If all has gone well, the rails are smooth and evenly spaced on the ties. You should be pretty happy at this point. small differences in the tie ends will be de-emphasized by painting, ballast and weathering. However, if there are ties that are clearly wrong, carefully trim with a chisel blade exacto taking several small cuts, inspecting after each rather than taking a lot off in one cut.
Laying in switches
This is a whole topic on it’s own. I’ll post something later.
 Steve Cox