Curved diamond crossings for the M&N RR - Part 4
If this is your first visit to Coxy’s N Scale and Railroad Blog, Welcome! If you are a returning reader, Welcome back! Thanks for visiting, I hope you enjoy the posts. If you have a moment, feel free to leave a comment at the end of the post.
Building a curved code 55 N Scale diamond crossing. The story so far…
This is a multi-part posting covering the construction of a custom Diamond Crossing in N Scale.
Part 1: Making accurate drawings of the N Scale curved diamond crossing from digital photographs of the layout.
Part 2: Installing the ties for the diamond crossing using the drawings and putting the first few rails in place.
Part 3: Installing and testing the remaining live rails.
Part 4: Guard rails for the crossing
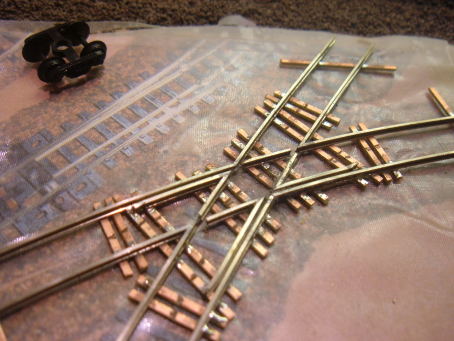
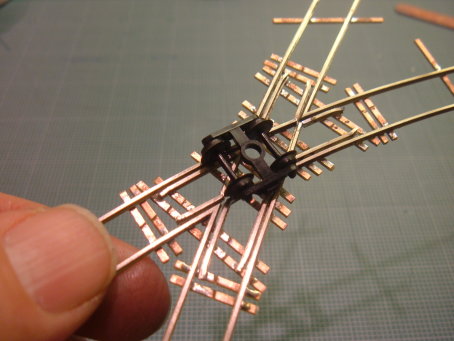
I had a little time tonight so I put in the guard rails. Here is where I got to tonight. The frogs have been mostly completed with the remaining seven guard rails.

Each guard rail makes a mitred joint with a live rail. Making each joint completes the running path through the frog for that live rail. Once each joint is completed, there should be a 0.025” gap between the live rails.
Puttin’ the guard rails in
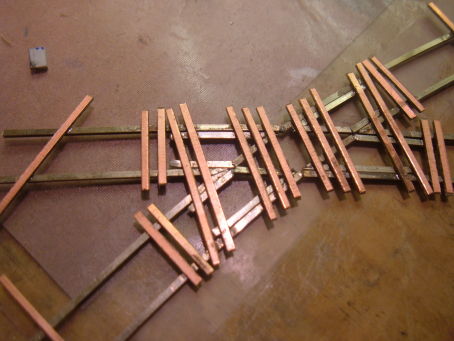
I already have one guard rail installed on the shallower leg. To begin with, I focused on the longer guard rails. I cut the some guard rail from stock that I had pre-curved and checked against the rails-only drawing.
Shaping the guard rails
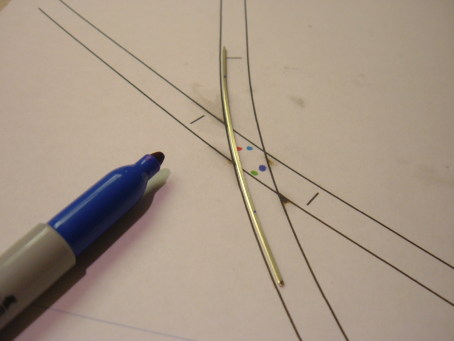
Each guard rail was cut from bent stock. I marked where to cut the frog end. I cut the rail a hair longer than needed and used the bench top sander to bevel the end so it could mate with the live rail in a mitered joint. (Think of the corner of a picture frame).
It took about two seconds on the sanding disc to get a nice angle then I checked it against the frog rail I was matching to. It usually only took two passes to get the angle acceptable. I then cut the guard rail to length with a rail nipper and bent the flare using needle nose pliers.
Solder blobs
Here and there, I had gone a little overboard with soldering the stock rails in place so the guard rails didn’t always sit on the ties evenly because of too much solder on the tie next to the stock rail. I removed as much solder as I could with solder wick and then heated the tie with plenty of flux and the remaining solder flowed out in a thin film on the tie.
Soldering the guard rails
I put plenty of flux on the rail joint and on the pcb ties where the guard rail would sit. I carefully tacked the guard to a tie then checked the join with the frog rail as well as alignment and clearance with the stock rail.
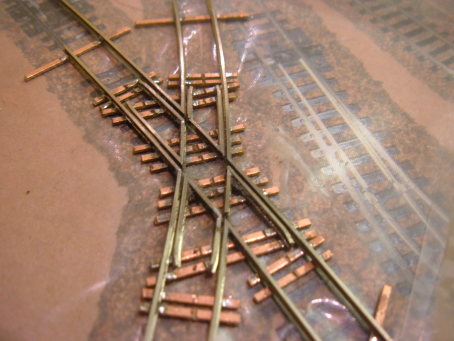
If all looked good, I soldered the guard in place and put plenty of solder on the joint itself. Here are the first couple of guard rails in place.
I repeated the process twice more until I had two adjacent frogs completed. As each guard rail was installed, the truck moved more and more smoothly as it was no longer dropping into the large gaps at the frogs. Here we are almost done with only one to go.
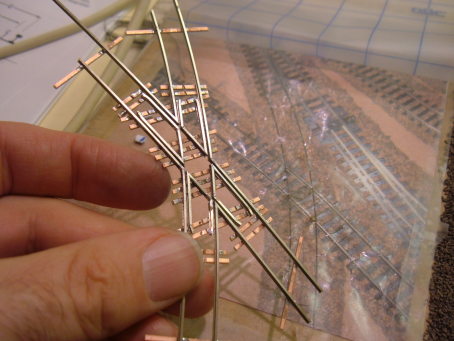
The last one was short and I again lost it on the floor for a few minutes but was able to find it and complete the outer guard rails. I had gently filed a few of the joints with a nail file to get rid of solder on the top of the rail heads. As I was doing this, the whole assembly was tending to move on the sticky sheet. I contemplated replacing the sheet but I decided that the crossing was holding it’s shape quite well and I was beyond the point where I needed to align to the picture below the sticky film.
Removing the crossing from the sticky sheet was easy as it was ready to come off. Other adhesive sheet brands may hold tighter. The crossing is most vulnerable to folding across the frogs near my forefinger in the picture below.
With the guard rails completed, I tested the frogs and flange ways with the MicroTrains truck with deep flanges. It is nice and smooth thanks to the nice sharp frog points and well aligned live rail segments.
I carefully flipped the crossing over and reinforced the underside of the frogs with some more solder using plenty of flux and a minimum of heat. The idea is to make them mondo strong. I did not want to unsolder any joints at this point!
Voila, a diamond crossing that just needs a diamond! Wahoo Buckaroo!!! I’m having fun tonight!

Next Steps
Next session, I’ll cut and solder the diamond from four pieces of rail. Following that I’ll consider gapping the frogs although I may wait till the rest of the ties are in place to make it as strong as possible before the frog cutting ceremony.
Earlier posts in this series
Part 1: Making accurate drawings of the N Scale curved diamond crossing from digital photographs of the layout.
Part 2: Installing the ties for the diamond crossing using the drawings and putting the first few rails in place.
Part 3: Installing and testing the remaining live rails.
Part 5: Installing the diamond
 Steve Cox
Reader Comments (2)
Thanks for taking the time to post all of this Steve. I have my own curved diamond to build on an n scale traction layout.
Happy New Year,
- Neil
Steve,
Thanks for a great website on building a curved diamond.
I'm about to start on mine, this was very helpful.
Also the last link showing how to build the actual diamond is not working.
Thanks,
Gary.